Please note that this documentation is for the most recent version of this extension. It may not be relevant for older versions. Related documentation can be found in the documentation directory of the extension.
Quick Start
1. Install the extension
Install the extension via composer or through the extension manager and add the static TypoScript templates to your root template.
2. Add neccecary pages
We recommend the following page structure. Configure the pages using the TypoScriptconstant editor.
🌎 Website root
├─ 📁 Data
│  └─ 🛒 Products
├─ 📄 Products list
│  ├─ 📄 Products detail
│  ├─ 📄 Basket
├─ 📄 Checkout
│  ├─ 📄 Error
│  ├─ 📄 Callback
│  ├─ 📄 Cancel
│  └─ 📄 Success
└─ 📁 Footer Menu
   ├─ 📄 Terms
   ├─ 📄 Disclaimer
   └─ 📄 Privacy
3. TypoScript configuration (minimal)
After you created all the necessary pages, you need to add a minimal TypoScript configuration. We recommend creating a simple text file that you save in your project root/ template storage folder or in the file system directly. Choose a "speaking" name for the file, that displays its purpose. In our example, we call the file "shop.contants.txt"Please exchange the IDs in the given example accordingly to the IDs in your installation. Email addresses, Shop names, and file path needs to be adjusted as well
themes.resourcesPrivatePath = fileadmin/
module.tx_shoppro.persistence.storagePid = 88
themes.configuration.extension.shop.basket.minimumOrderValue = 100
themes.configuration.extension.shop.ups.pid = 0
themes.configuration.container.shop = 88
themes.configuration.extension.shop.basket.displayType = b2c
themes.configuration.extension.shop.detail.image.width = 450
themes.configuration.extension.shop.detail.image.height = 450
themes.configuration.extension.shop.email.to.name = Mein Shop Name
themes.configuration.extension.shop.email.from.email = shop@beispiel.de
themes.configuration.extension.shop.email.from.name =  Mein Shop Name
themes.configuration.extension.shop.email.to.email = shop@beispiel.de
themes.configuration.extension.shop.basket.minimumOrderValue = 100
themes.configuration.pages.shop.detail = 81
themes.configuration.pages.shop.checkoutCancel = 87
themes.configuration.pages.shop.notFound = 68
themes.configuration.pages.shop.basket = 82
themes.configuration.pages.shop.list = 80
themes.configuration.pages.shop.checkout = 83
themes.configuration.pages.shop.checkoutError = 84
themes.configuration.pages.shop.checkoutSuccess = 86
themes.configuration.pages.shop.checkoutCallback = 85
themes.configuration.pages.terms = 63
themes.configuration.pages.disclaimer = 63
themes.configuration.pages.privacy = 63
themes.configuration.extension.shop.checkout.payPalCheckout.payPalCheckoutSecret = XXX
themes.configuration.extension.shop.checkout.payPalCheckout.payPalCheckoutClientId = XXX
themes.configuration.extension.shop.checkout.payPalCheckout.sandbox = 1
themes.configuration.extension.shop.checkout.payPalCheckout.paymentTitle = Bestellung Mein Shop
Include the file in your root template according to your project structure.
@import 'EXT:myPageSetup/templates/ts/shop.constants.txt'4. Add plugins on pages
- Data-Products This page is configured as type "Folder". In settings "Behavior - Contains Plugin" you choose the plugin "Products". Once the page is saved, the icon of the page in the page tree will change like you see here.
- Products-List This page contains your product listing. It will be configured as page type "standard". You need to add a plugin Shop product list and single view as content element.
- Products-detail This page contains the detail viwe of your products. It will be configured as page type "standard". You need to add a plugin Shop product list and single view as content element.
- Checkout Page This page is invisible in the menu and should not be included in the search index/site map. A Shop checkout plugin needs to be added to this page so that the ordering process can take place.
- Error Page This page is invisible in the menu and should not be included in the search index/site map. A Shop checkout plugin needs to be added to this page so that any order errors can be dealt with.
- Callback Page This page is invisible in the menu and should not be included in the search index/site map. A Shop checkout plugin needs to be added to this page so that callbacks from orders can be processed (e.g. from PayPal).
- Cancel Page This page is invisible in the menu and should not be included in the search index/site map. A Shop checkout plugin needs to be added to this page so that order cancellations can be processed.
- Success Page This page is invisible in the menu and should not be included in the search index/site map. A Shop checkout plugin needs to be added to this page so that orders can be completed.
- Terms/Disclaimer/Privac-Pages These are pages are regular pages with page type "standard". They contain pure text content with the needed pieces of information.
Settings plugin product list and single view (minimal)
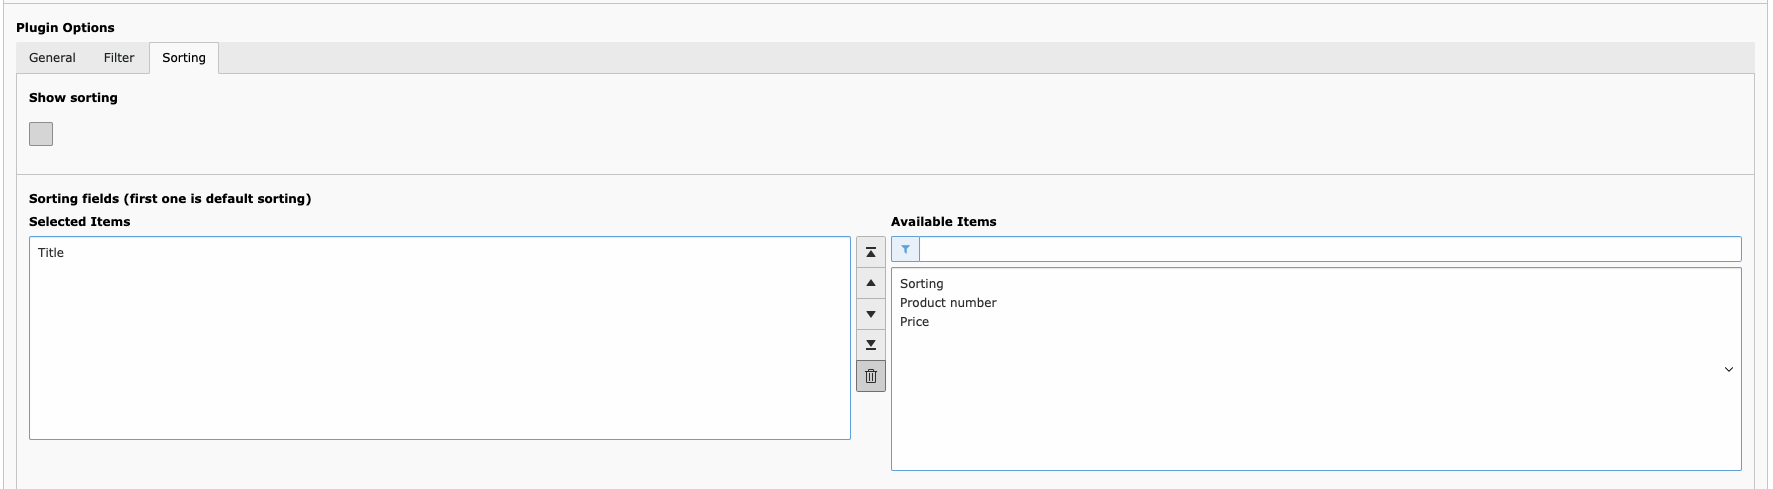
In the plugin, in the "General" tab, select one of the display modes - Columns, Group or Deck (in the Pro version, the Isotope mode is also available). The display modes define the rendering of the products in the frontend based on the display modes in Boostrap 4 / Cards.
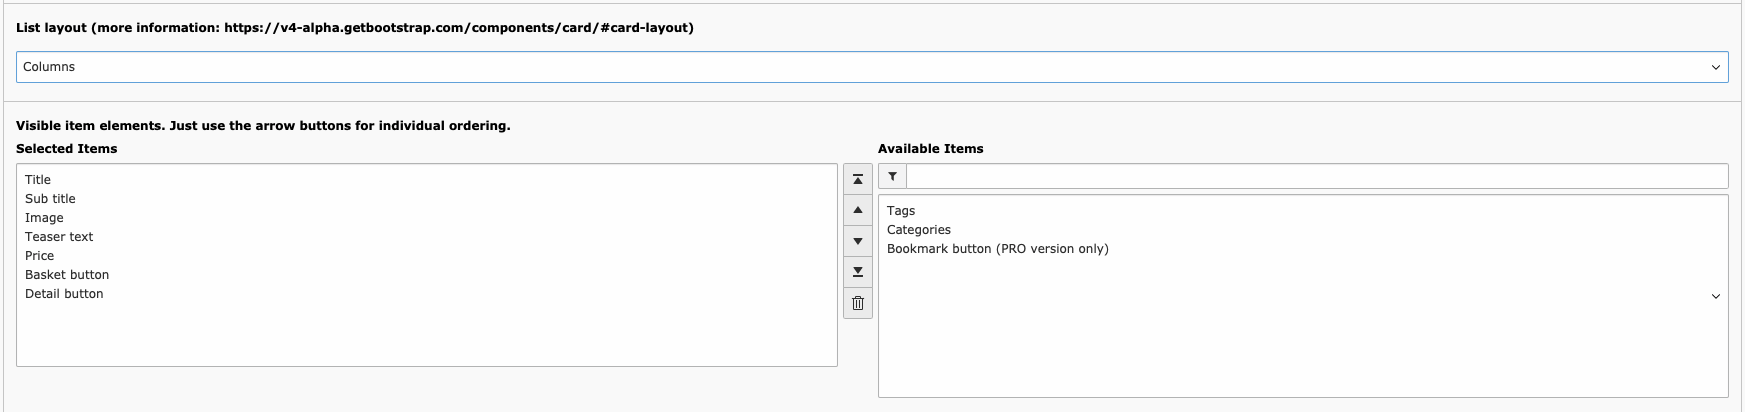
Furthermore, please select here the visible elements that should be output.
At least one element must be selected in the "Sorting" tab for the plugin to be saved.
5. Adding products (minimal)
The product records must be inserted on the Data-Products page. Select the page in the page tree and switch to the list module. Add a new record of type "Products". Fill in at least the Title, Teaser, Description, Price, In Stock, In Stock Amount, Unit Factor, Unit and Images fields. Create at least 3 products.
5. Adding a global basket button
You need to put a global shopping basket button on your page otherwise it will not be possible to add products to the shopping basket!
The shopping basket button can be included either as a content element or as a TypoScript marker.
-
Adding the predefined shopping basket button marker in the Fluid template:
<f:cObject typoscriptObjectPath="lib.shop.basketButton" /> -
Adding the predefined shopping basket button in TypoScript:
 page = PAGE
 page {
   10 = USER
   10 < lib.shop.basketButton
   # ...
 }
Alternatively, add the shopping basket button as a plugin.
6. Make HTML templates available for further editing
Your store should now already display products on your website and be functional. To further edit the look of your store, you can copy the HTML templates to your project directory. Copy all files from the extension under Resources/Private according to the diagram below.
📄 Extensions
└─ 📁 Shop
   ├─ 📄 Layout
   ├─ 📄 Partials
   └─ 📄 Templates
Adjust the path to the files in the constants file shop.constants.txt
themes.resourcesPrivatePath = EXT:myPageSetup/Extensions/Shop/Finished :-)

TYPO3 Shop by coding.ms
An extensive shop for TYPO3 for realizing Webshops, Online-Shops or Payment-Subscriptions, comparable with tt_products, Cart or Aimeos. It includes PayPal, PayPal-Checkout, Klarna, Stripe, Bookmarks, UPS-API, invoice generation, a backend module, compare feature, graduated prices, plus product variants, filters, and tax and shipping logic for practical shop operations.