Please note that this documentation is for the most recent version of this extension. It may not be relevant for older versions. Related documentation can be found in the documentation directory of the extension.
Configuring Stripe Checkout
Attention:
Stripe Checkout requires the Pro version of the shop extension!
Notice:
The Stripe checkout described here refers to the sale of regular products via the shopping cart. When it comes to paying for Stripe subscriptions, switch to https://www.coding.ms/documentation/typo3-shop/configuration/subscriptions
stateDiagram-v2
    %% Frontend
    [*] --> prepared : Customer builds the cart\nand starts checkout
    prepared --> ordered : Checkout completed\nconfirmation email sent\ninvoice number assigned
    %% Stripe Payment
    ordered --> paid : Payment successful\n(Stripe webhook)
    %% Shipping & completion
    paid --> shipped : Shipping performed manually
    paid --> processed : Completed without shipping\n(e.g. digital product)
    shipped --> processed : Completed after shipping
    %% Special case: cancellation before payment
    prepared --> canceled : Payment failed\nor was cancelled
    canceled --> prepared : Payment can be retried
    %% Conditions
    note right of processed
        Conditions:
        - paid_date MUST be set
        - shipped_date MUST be set
        if shipping has occurred
    end note
Further actions:
- Returns: Possible as soon as the goods have been shipped – i.e., in the status
shippedorprocessed. - Deletion: Deleting an order is only possible in the status
prepared.
Preparation
In order to use Stripe Checkout you need the following:
- an active Stripe account
- a composer-based installation of TYPO3
Stripe API access credentials
- On the Stripe login page, switch to the Developer -> API key area (https://dashboard.stripe.com/apikeys)
- Create new API credentials
- A public and a secret key will be displayed. The public key starts with
pk_live_…orpk_test…, the secret key starts withsk_live_…orsk_test…. - These keys must be stored in TYPO3 using TypoScript constants
- Create an endpoint secret to be able to listen to stripe events (https://dashboard.stripe.com/webhooks/create) (see chapter "Events" for more information)
- Save the endpoint secret in the
singlePaymentIntentSucceededEndpointSecretTypoScript constant
Events
Payment Intent Succeeded Event
You need to configure an event listener for the payment_intent.succeeded event so that your Stripe checkout knows when a payment has arrived via Stripe. The setup is done in 2 steps.
- setup of the webhook page
- configuration of the webhook in the Stripe dashboard
Setup of the webhook page
The webhook page is a normal page that we define and that should call the stripeCallbackAction in the BackendOrderController.
You create a normal page for this, which is not visible in the menu, is excluded from the sitemap.xml, and is set to noindex/nofollow. The page will be titled Stripe-Callback and given the slug s to keep the URL nice and short. When created, our page was given the uid 123.
🌎 Website root
├─ ...
└─ 📄 Stripe-Callback [123]
A plugin of the type Shop Checkout must now be created on this page. To ensure that the Stripe callback executes the correct controller action, it is imperative that the corresponding route is set up in the site configuration. In our case, this looks like this:
The stripe callback should call the stripeCallbackAction in the BackendOrderController. For the simplicity of the setup a short url can be configured
  ShopCheckoutPlugin:
    type: Extbase
    limitToPages:
      - {uid of the page with the basket order plugin}
    extension: Shop
    plugin: BasketOrder
    routes:
      - routePath: '/stripe-callback'
        _controller: 'BasketOrder::stripeCallback'
It's important that the correct page UID is entered, in our case 123. The entered routePath extends our page slug. It ensures that our call calls the controller action BasketOrder::stripeCallback.
This means that the URL that needs to be entered into the Stripe webhook looks like this: https://www.domain.tld/s/stripe-callback.
Now clear the system cache and call the URL in your browser. If a white page with a '403' appears, everything should be set up correctly.
Caution:
Your page must not be password-protected, such as .htaccess, otherwise the Stripe callback won't get through!
Configuration of the webhook in the Stripe dashboard
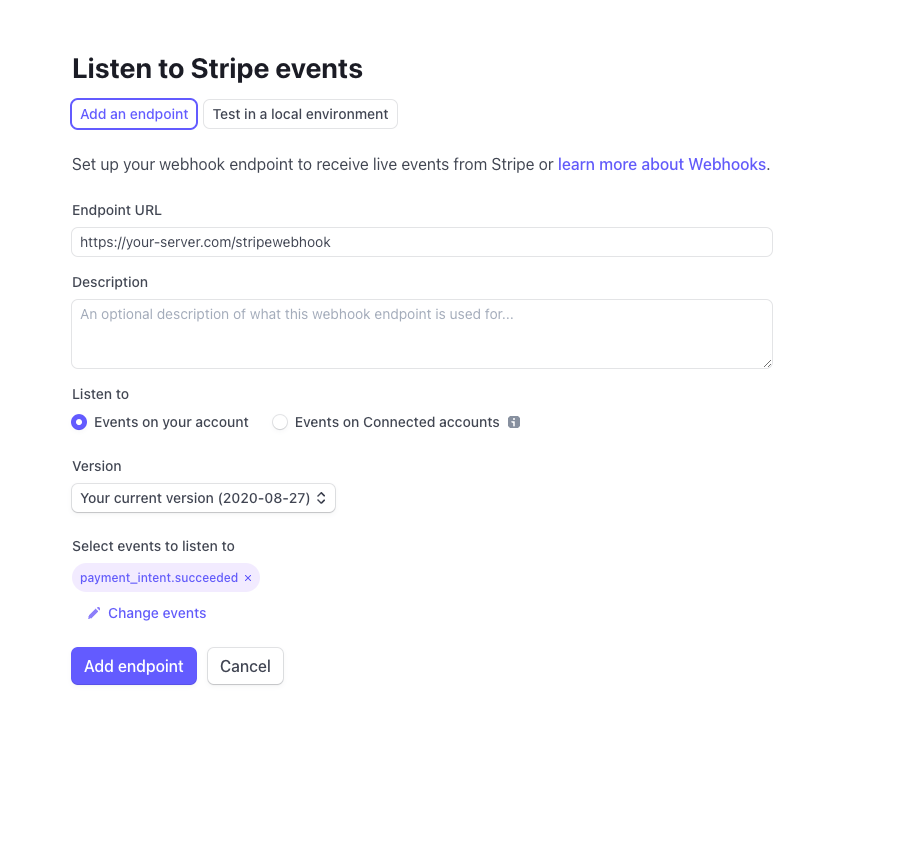
- Go to the https://dashboard.stripe.com/webhooks page and click Add Endpoint.
- Enter the URL of the page that was set up in step "Setup of the webhook page".
- Select "Select Events" and select
payment_intent.succeeded. - click "Add Endpoint".
- click on the newly created webhook entry and copy the endpoint secret for signature.
- paste the key into the
singlePaymentIntentSucceededEndpointSecretTypoScript constant
To test the webhook in a local development environment, the Stripe cli tool can be used. You can find more information here: https://stripe.com/docs/webhooks/quickstart#download
Add additional actions after a successful payment
If you need actions to be carried out after successful payment, use the StripePaid event listener.
- Create a new event listener:
<?php namespace YourVendor\YourExtension\EventListener; use CodingMs\ShopPro\Event\BasketOrder\StripePaidEvent; class DoSomeThingEventListener { public function __invoke(StripePaidEvent $event): void { /* Do something */ } } - Then register the event listener in
Configuration/Services.yaml:services: YourVendor\YourExtension\EventListener\DoSomeThingEventListener: tags: - name: event.listener identifier: 'myListener' event: CodingMs\ShopPro\Event\BasketOrder\StripePaidEvent
Testing
See: https://stripe.com/docs/testing
Test credit card
In order to simulate/test the card payment flow from end user perspective use the following card details:
Credit card number: 4242 4242 4242 4242CVV: 123Exp: 12/25 (Or any other valid date in the future)
Error handling and messages
The Stripe checkout uses the FlashMessage.push() JavaScript method for pushing messages. For this service you need to define a div container as wrapper for the messages, for example <div id="shop-flash-messages"></div>.
Calling the webhook ends in a 404 error
Calling the webhook results a:
Page Not Found
Reason: Request parameters could not be validated (&cHash empty)
Solution 1.
Open the Installtool and disable pageNotFoundOnCHashError setting: [FE][pageNotFoundOnCHashError] = false
Solution 2.
Exclude the parameters of the request like this (LocalConfigration/settings.php):
'FE' => [
    'cacheHash' => [
        'enforceValidation' => true,
        'excludedParameters' => [
            'payment_intent',
            'payment_intent_client_secret',
            'redirect_status',
        ],
    ],
],
TYPO3 Shop by coding.ms
An extensive shop for TYPO3 for realizing Webshops, Online-Shops or Payment-Subscriptions, comparable with tt_products, Cart or Aimeos. It includes PayPal, PayPal-Checkout, Klarna, Stripe, Bookmarks, UPS-API, invoice generation, a backend module, compare feature, graduated prices, plus product variants, filters, and tax and shipping logic for practical shop operations.