Please note that this documentation is for the most recent version of this extension. It may not be relevant for older versions. Related documentation can be found in the documentation directory of the extension.
Subscriptions
With the shop you're able to provide a subscription system for frontend user using Stripe. For this you need insert the Subscription-Table plugin on your website. This offers you a listing of avaiable subscription products, which needs to be configured in Stripe, and handles the redirect when the user starts a new subscription.You're optionally able to insert the Stripe sunscription-prices in regualar product-records, so that you've a subscription-button attached to this products.
Defining Subscriptions
- Log-in on dashboard.stripe.com and switch to the Products section. Here you need to create a product for each subscription you offer - for example Basic-Plan and Premium-Plan. Products must be created separately in sandbox and live mode, although products can be copied from sandbox to live mode. This products needs the following data:
- Name: Product names are visible to customers at checkout, in receipts, invoices, and the customer portal.
- Description: Product descriptions appear at checkout, in the customer portal, and on quotes.
- Insert a price and ensure Recurring payment is selected.
- Add a meta tag with the key
categoryto the product. Products can be filtered by the value of this tag inSubscriptionTableplugin (See section "Display table of subscription products"). - Add a meta tag to the product with the key
usergroups. Set the value of this tag to a comma-separated list of frontend user group ids. These user groups are automatically added to the frontend user who purchases a subscription that includes this product. When a subscription ends, these user groups are automatically removed from the frontend user. The frontend-user and frontend-usergroups must be in the same record-storage! - Add an optional meta tag with the key
trial_period_days, which can define the amount of days for a trial period for the first subscription of a user. This will be only used, if thefe_users.tx_shop_stripe_trial_period_endfield is empty. The days must be at least 2 days! - Add an optional meta tag with the key
sorting_index, which can change the display ordering of products. - Configure webhooks (See section "Configure stripe webhooks").
Attention:
When using Stripe customers the frontend user needs the short iso-code of his country in his user record (for example: DE)!
Setup-Fee
If you've a setup-fee on your subscription, just create a separate Stripe product for this. This product contains only the name, which appears in checkout and invoice, and a one-time price. Copy the price-id (price_xyz…) and insert it into your subscripion-product in meta-data with key setup_fee.By having this relation, the shop-extension adds this price on a new subscription in checkout. If you need an additional notice about the setup-fee in the subscription-table, just use the meta-data key setup_fee_description with .
Meta field overview
| Field | Type | Description |
|---|---|---|
| category | string | Categorization identifier. |
| usergroups | int, comma-separated | One or more frontend-usergroup uids. They will be attached to the frontend-user on subscription. |
| trial_period_days | int | Amount of trial days. 0 means no trial period available. |
| sorting_index | int | Sorting index number, for changing the display order of products in frontend. |
| css_class | string | One or more CSS classes separated by a space for frontend rendering. |
| setup_fee | string | This is a Stripe price-id which contains the label+value of the setup-fee. |
| setup_fee_description | string | This is an optional notice text for the setup-fee in subscription-table. |
If your setup-fee is tax-less, because it's for instance a security guarantee, you can enable themes.configuration.extension.shop.checkout.stripe.setupFeeAlwaysTaxFree = 1 and the setup fee will be tax-free.
Taxes
If you need to use taxes, you can use the "Stripe Tax" add-on or create tax-records with this Shop-Extension. When you're using tax-records, you need to assign a Stripe-Tax Id and check the Default-Stripe-Taxrate checkbox - if this is done, the subscription-link will check the users-country-code (for this it's required that fe_users.country contains only a 2 digit ISO-Code of the country - EXT:modules provides a frontend-user management with those contry-codes) and fetch the required tax-record-overlay and the assigned Stripe-Tax-Id. If you need no tax-configuration, because you're using Stripe-Tax, you simply don't check any Tax-Record as Default-Stripe-Taxrate.
Notice:
When creating a Tax in Stripe, you need to decide if the Tax is already included in your product-prices or not - this means for instance, if you're working with net prices in your products, you need to choose exclusive in your tax definition in Stripe!
You can also restrict the allowed countries for Stripe subscriptions, although this is unfortunately only possible via the delivery address (even for digital products). You can achieve this with the following configuration:
themes.configuration.extension.shop.checkout.stripe.subscriptionAllowedCountryIsoCodes = de,at,chConfigure stripe webhooks
A webhook for receiving Stripe events is fundamentally required to automatically assign or remove the user groups linked to a Stripe product and to correctly handle actions such as subscription changes.
For ease of configuration, a Short URL can be set up for the page with a SubscriptionTable or Subscriptions plugin.
  ShopSubscriptionsPlugin:
    type: Extbase
    limitToPages:
      - {page uid with the Subscriptions plugin}
    extension: ShopPro
    plugin: Subscriptions
    routes:
      - routePath: '/stripe-subscription-callback'
        _controller: 'Subscription::stripeSubscriptionCallback'
    defaultController: 'Subscription::list'
or
  ShopSubscriptionsPlugin:
    type: Extbase
    limitToPages:
      - {page uid with the SubscriptionTable plugin}
    extension: ShopPro
    plugin: SubscriptionTable
    routes:
      - routePath: '/stripe-subscription-callback'
        _controller: 'Subscription::stripeSubscriptionCallback'
    defaultController: 'Subscription::list'
Configuration of the webhook in the Stripe dashboard
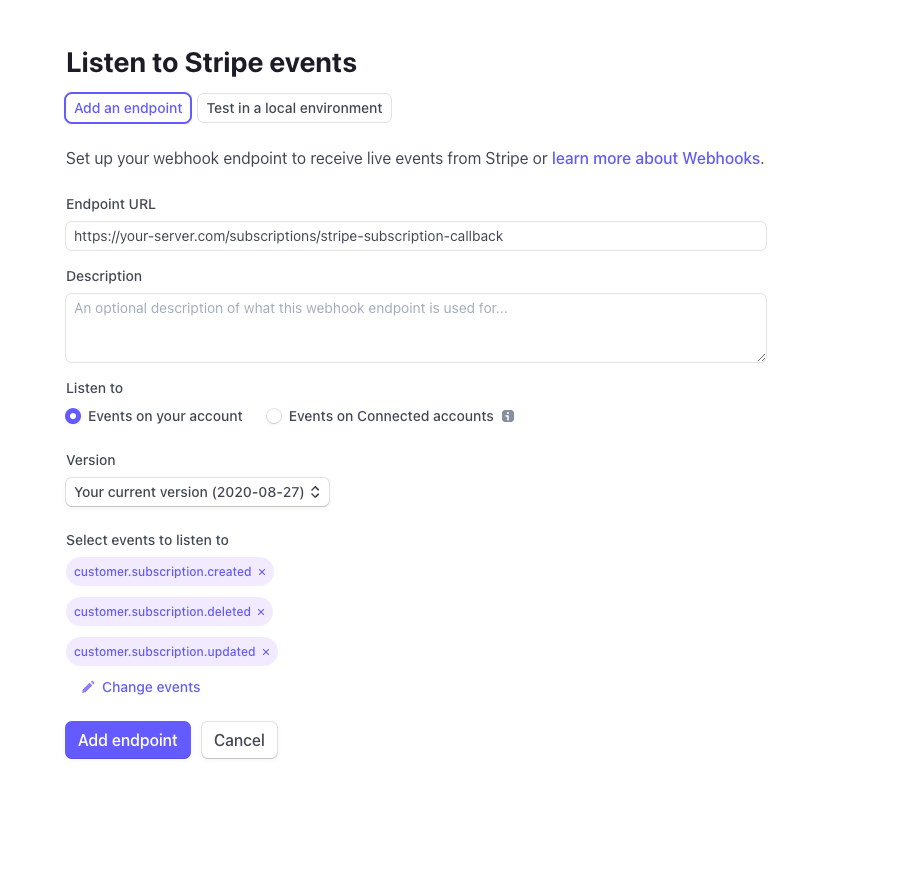
- Go to the https://dashboard.stripe.com/webhooks page and click Add Endpoint.
- Enter the URL of the page that was set up in step "Setup of the webhook page".
- Select "Select Events" and select
checkout.session.completed,customer.subscription.created,customer.subscription.updatedandcustomer.subscription.deleted. - Click "Add Endpoint".
- Click on the newly created webhook entry and copy the endpoint secret for signature.
- Paste the key into the
subscriptionEndpointSecretTypoScript constant
Local webhook usage
-
Install the Stripe CLIDownload the official Debian package and install it:
# Example for Debian/Ubuntu
wget https://stripe.jfrog.io/artifactory/deb-local/pool/main/s/stripe-cli/stripe-cli_<version>_amd64.deb
sudo dpkg -i stripe-cli_<version>_amd64.deb
Replace
<version>with the latest version available on the Stripe repository page. -
Connect your Stripe account
stripe login– This will open a browser window where you log in to Stripe and authorize access.
-
Forward webhooksBack in your terminal, start the listener and forward events to your DDEV URL:
stripe listen \
  --forward-to https://typo3-12-13.shop13.ddev.site/subscription/your-subscriptions/stripe-subscription-callback
– The listener will subscribe to Stripe events (e.g.,
invoice.paid,customer.subscription.updated) and send them to your local callback endpoint. Make sure that the local usage gets its own webhook secret, which is displayed on the CLI when starting:Your webhook signing secret is whsec_03b75a… -
Verify the callback endpoint in TYPO3– Ensure your TYPO3 project is reachable at the DDEV URL and that your callback controller correctly processes the incoming JSON.– If needed, make sure HTTPS is enabled in DDEV (it is by default) and adjust your
config.yamlaccordingly.
PSR-14 Events
If
- the webhook is set up correctly
- one of the supported events arrives at the webhook
- a user exists in the database with the corresponding Stripe-customer id
a PSR-14 event is emitted.
Add the following to Configuration/Services.yaml to react to the events:
  CodingMs\ShopPro\EventListener\Stripe\Subscriptions\StripeSubscriptionCreatedMailEventListener:
      tags:
          - name: event.listener
            identifier: 'shop.stripe.subscriptionCreatedDecreaseStockAmounts'
            event: CodingMs\ShopPro\Event\Stripe\Subscriptions\StripeSubscriptionCreatedEvent
  CodingMs\ShopPro\EventListener\Stripe\Subscriptions\StripeSubscriptionCreatedDecreaseStockAmountsEventListener:
      tags:
          - name: event.listener
            identifier: 'shop.stripe.subscriptionCreatedMail'
            event: CodingMs\ShopPro\Event\Stripe\Subscriptions\StripeSubscriptionCreatedEvent
  CodingMs\ShopPro\EventListener\Stripe\Subscriptions\StripeSubscriptionDeletedMailEventListener:
      tags:
          - name: event.listener
            identifier: 'shop.stripe.subscriptionDeletedMail'
            event: CodingMs\ShopPro\Event\Stripe\Subscriptions\StripeSubscriptionDeletedEvent
  CodingMs\ShopPro\EventListener\Stripe\Subscriptions\StripeSubscriptionUpdatedMailEventListener:
      tags:
          - name: event.listener
            identifier: 'shop.stripe.subscriptionUpdatedMail'
            event: CodingMs\ShopPro\Event\Stripe\Subscriptions\StripeSubscriptionUpdatedEvent
  CodingMs\ShopPro\EventListener\Stripe\Subscriptions\StripeSubscriptionTrailWillEndMailEventListener:
      tags:
          - name: event.listener
            identifier: 'shop.stripe.subscriptionTrailWillEndMail'
            event: CodingMs\ShopPro\Event\Stripe\Subscriptions\StripeSubscriptionTrailWillEndEvent
Notice:
When the user cancel a subscription, which has a remaining period, Stripe sends first an Update event and when the period end an additional Delete event!
This events contains the Stripe subscription object, the associated frontend user and the settings-node.
You can find more information about registering an event listener here: https://docs.typo3.org/m/typo3/reference-coreapi/main/en-us/ApiOverview/Events/EventDispatcher/Index.html#registering-the-event-listener
Mails
The previously described events can be used, for sending mails to the admin or customer, when a subscription was created, updated, deleted or when the trial-period ends.
Notice:
An example of the subscription objects, which are availabe in the Fluid mail templates, can be found in the EXT:shop_pro/Development/Stripe/Subscription folder.
Display table of subscription products
- use the plugin
SubscriptionTable - during product creation insert a Metadata information
categoryand set a custom identifier (for example: subscription). This allows you to display specific subscription products in your tables.
Display list of subscriptions
This plugin displays all available subscriptions.
If a user is logged in, he is able to supscribe an subscription. If no user is logged-in, the subscription buttons won't be visible and the user get's only information.
- use the plugin
Subscriptions
The user has the possibility to view the list of his active and already expired subscriptions and to cancel the subscriptions immediately or at the end of the subscription period. For each subscription, the user has the possibility to view the list of invoices and download them.
Side note: User sync
Stripe requires to have a Stripe-Customer record for each of our frontend user. For solving this requirement, our frontend user has a field Stripe-Customer ID. When a frontend user is logged-in and the Stripe-Customer ID is emtpy, the Shop tries to create a new Stripe-Customer and inserts the Stipe-Customer ID within the user. If the frontend user address data will be changed, the changes data will be synchronized automatically to the Stripe-Customer.
It is very important to keep the Stripe-Customer is up-to-date when using some third-party tools or scripts for changing frontend user data. If necessary, the user synchronization can be called manually. An example can be found in EXT:shop_pro/Classes/EventListener/AfterProfileUpdateEventListener.php
public function __invoke(AfterProfileUpdatedEvent $event): void
{
    $frontendUserRepository = GeneralUtility::makeInstance(FrontendUserRepository::class);
    $frontendUser = $frontendUserRepository->findOneByUid($event->getFrontendUser()->getUid() ?? 0);
    if(!isset($frontendUser)) {
        return;
    }
    $routing = $GLOBALS['TYPO3_REQUEST']->getAttribute('routing');
    $pageId = $routing->getPageId();
    $subscriptionServiceSettings = TypoScriptService::getTypoScript(
        $pageId
    )['plugin']['tx_shop']['settings']['basketOrder']['orderOptions']['stripe'];
    $subscriptionService = GeneralUtility::makeInstance(SubscriptionService::class, $subscriptionServiceSettings);
    $subscriptionService->updateStripeCustomer($frontendUser);
}
Notice:
All Stripe elements will be used in language which the user uses on the website right now. This language is fetched from the site configuration.
Troubleshooting
If the redirect to Stripe for subscription completion isn't working, please enable logging (see How-To Debugging). This logs helpful information that can help you troubleshoot the issue.
Checklist for Going Live
Attention:
This list may not be complete!
-
Change API keys
Most important point - Test keys do not work in live mode, and vice versa.
sk_test_xxx→ replace withsk_live_xxxpk_test_xxx→ replace withpk_live_xxx
-
Set up new webhooks (and adjust the secret)
Stripe strictly separates test and live events.
- You must set up new webhook endpoints in the Stripe dashboard in live mode.
- Save the new webhook secret (
whsec_...) and use it in your PHP handler.
-
Check payment methods
Many payment methods are available in test mode that may not be enabled or activated in live mode.
- Check which payment methods are active under Settings > Payments.
- If necessary, activate SEPA, SOFORT, Apple Pay, giropay, etc.
- Test cards will no longer work – real payments must be made.
-
Check tax logic (if enabled)
If you use Stripe Tax or manual tax calculation, check the live configuration.
- Have you defined the correct tax rates in live mode?
- Are you correctly integrating tax_behavior, automatic_tax, and inclusive/exclusive in your code?
-
Adjust product and price IDs
Products and prices in test mode are not identical to those in live mode.
- IDs such as
prod_...andprice_...are test/live-specific. - Create the products in the dashboard in live mode or automate this via the API.
- Adjust your PHP constants or configuration sources accordingly.
- IDs such as
-
Subscriptions: Test Data ≠ Live Data
Subscriptions already created in test mode are not transferable.
- You must create all customers again in live mode.
- If necessary, use customer_metadata for assignment.
-
Check Email Templates & Branding
Customize customer emails for invoices, payment errors, etc. under Settings > Branding & Email.Have you configured the email sender, logo, colors, etc. for live?
-
Test Live Payment (with a small, real payment)
Make your own live payment with a real card and a small amount.
Check whether:
- Customers are created correctly
- Webhooks are triggered correctly
- Subscriptions are booked
- Invoices/taxes are generated correctly
- Your system continues to function correctly
-
Enable Error Logging & Monitoring
- Check error logging in your TYPO3 and PHP code.
- If necessary, activate notifications in Stripe (e.g., for failed payments).
-
Time-dependent processes (e.g., renewals, terminations)
- Does the termination logic work?
- What happens in the event of a downgrade/upgrade?
- Are reactivations handled properly?
-
Data protection & compliance
- Ensure that customer data is stored in compliance with the GDPR.
- Document how you handle payment data, invoices, and deletion obligations.
- While Stripe is compliant, you must document your own role in processing (sign a data processing agreement with Stripe).

TYPO3 Shop by coding.ms
An extensive shop for TYPO3 for realizing Webshops, Online-Shops or Payment-Subscriptions, comparable with tt_products, Cart or Aimeos. It includes PayPal, PayPal-Checkout, Klarna, Stripe, Bookmarks, UPS-API, invoice generation, a backend module, compare feature, graduated prices, plus product variants, filters, and tax and shipping logic for practical shop operations.